
TL;DR

Get audio and creator gear delivered free with Prime
- Fast, free delivery on millions of items
- Prime Video, Amazon Music and more included
- Member-only deals all year
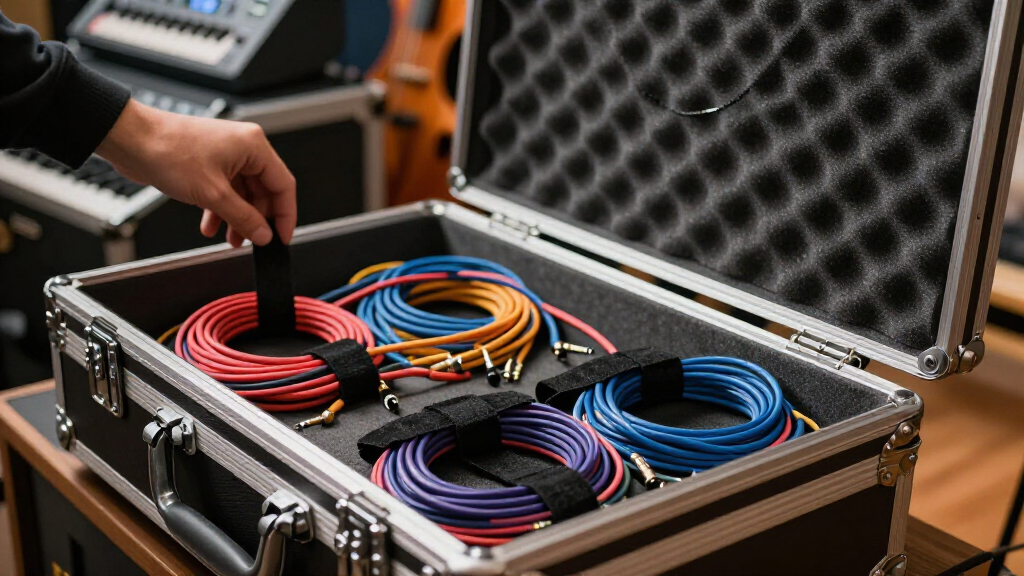
Organizing cables in a custom flight case is about thoughtful design, proper coiling, clear labeling, and disciplined inventory. This keeps gear protected, speeds up setup, and prevents costly mistakes.
Ever walked into a gig and felt overwhelmed by a jumble of cables? No matter how expensive your gear, disorganized cables slow you down and risk damage. The truth is, smart cable management isn’t just neat—it’s essential for efficiency and longevity.
In this guide, you’ll learn practical, step-by-step best practices for organizing cables in a custom flight case. From designing your layout to labeling and protecting connectors, these tips turn chaos into a well-oiled setup machine.
Design your case layout based on your workflow, grouping cables by function and usage frequency.
Use the over-under coiling method and secure each coil with reusable ties to extend cable life and prevent tangles.
Label everything clearly and consistently, combining durable labels with a simple color system for quick identification.
Separate power from signal/data cables to prevent interference and physical damage.
Implement a routine of inspection, testing, and inventory management to keep your gear reliable and organized.
Field guide · custom flight cases
Turn cable chaos into show-ready order
The best cable system follows your workflow: separate power from signal, coil every line correctly, label both ends, protect connectors, and make inventory checks part of every pack-out.
01 · case architecture
Design around the gig
Organize cables according to how they are deployed, not simply by size. First-needed equipment belongs near the access point, while spares and specialty adapters can sit deeper in the case.
Group by function
Build clear zones
Give audio, video, data, lighting, RF, control, and mains power defined compartments or labeled bags.
Prioritize access
Top-load essentials
Place power distribution, stage boxes, and the cables used first near the lid or access door.
Separate reserves
Show stock vs spares
Keep daily deployment cables apart from backups, rare adapters, and emergency replacements.
Touring systems
Create job kits
Bundle complete cable sets for each rack, stage position, department, or repeated system assignment.
Weight control
Heavy items go low
Store dense power coils and hardware below delicate data, fiber, breakout tails, and active cables.
Contain the small stuff
Use visible pouches
Place adapters and converters in labeled bins or transparent pouches so missing pieces stand out.
02 · signal integrity
Keep power apart
Mains cables carry higher current and can introduce noise when routed closely beside sensitive signal lines. Physical separation also keeps heavy cords from crushing fiber and data cables.
Zone A · high current
Power compartment
Use a strong, lower compartment for mains leads, distribution cables, and heavy-duty power accessories.
- Keep damaged mains cables quarantined
- Support heavy coils during transport
- Prevent plugs from striking other gear
Zone B · low voltage
Signal + data compartment
Give analog audio, network, video, control, and fiber protected space away from weight and pressure.
- Cap and clean fiber connectors
- Avoid tight bends in coax and network lines
- Pad delicate pins and locking mechanisms
Use dividers for storage and maintain physical distance wherever possible. When routes must cross, keep the shared path brief.
03 · cable handling
Master the over-under
Correct coiling follows the cable’s natural twist. It prevents memory, kinks, tangles, and internal fatigue while allowing the cable to deploy smoothly at the next show.
Start naturally
Make the first loop over
Guide the cable into a relaxed loop without wrapping it tightly around your elbow or hand.
Reverse the twist
Turn the next loop under
Rotate your hand inward so the second loop compensates for the cable’s natural torsion.
Repeat evenly
Alternate over and under
Maintain a generous diameter and never force stiff, coaxial, multicore, or fiber cable into a small coil.
Secure safely
Finish with a reusable tie
Use hook-and-loop, keep connectors inside or alongside the coil, and avoid tape or tight plastic ties.
04 · labels + protection
Make every cable obvious
A technician should be able to identify a cable at either end without opening the coil. Color accelerates recognition, but written information remains the reliable source of truth.
| Method | Durability | Fast recognition | Best-practice verdict |
|---|---|---|---|
| Heat-shrink identification | ✓Excellent | ✓Clear at both ends | Preferred for permanent inventory |
| Self-laminating marker | ✓Strong | ✓Readable and compact | Ideal for retrofit labeling |
| Color coding alone | ~May fade | ~Lighting dependent | Use only with written labels |
| Tape or temporary notes | ✗Short-lived | ✗Can peel or smear | Temporary use only |
05 · pack-out discipline
The four-point reset
Organization survives only when the same routine happens after every deployment. Make faults and missing items visible before the case reaches the next venue.
Check the jacket
Look for cuts, flattening, heat damage, loose strain reliefs, corrosion, and sharp bends.
Verify continuity
Test suspect cables immediately and flag intermittent connections before they return to service.
Remove failures
Never return a damaged mains or signal cable to the show compartment for continued use.
Reconcile inventory
Match every coil, adapter, pouch, and kit against a printed or digital pack-out list.
Design for deployment order, divide power from signal, coil over-under, label both ends, protect connectors, and reset the inventory after every job. The payoff is faster setup, longer cable life, cleaner troubleshooting, and fewer expensive surprises.
Design Your Case Around How You Work
The first step to perfect cable organization is thinking about your actual workflow. If you’re a DJ or AV tech, your case should reflect your setup and tear-down process. Group cables by function—audio, video, power, data—and keep key items near the access point.
For example, placing power strips and stage boxes at the top allows for quick access, minimizing delays during setup or breakdown. Dedicated compartments or labeled bags help you instantly identify what you need, reducing the risk of forgetting essential items or grabbing the wrong cables. This thoughtful layout also streamlines the process under pressure, whether you’re on a tight schedule or troubleshooting during a show.
Think about how you pack and unpack—packing teardown items in reverse order can save time. If you’re touring, creating self-contained kits for each rack or stage position means you can quickly reassemble without searching for missing components, which reduces errors and setup time. In the end, a case designed around your specific workflow enhances efficiency and reduces stress during critical moments.
cable management reel for custom flight case
As an affiliate, we earn on qualifying purchases.
As an affiliate, we earn on qualifying purchases.
Keep Power Cables Separate from Signal and Data Cables
Power and signal cables should never be packed together haphazardly. Mixing them can lead to electromagnetic interference, which causes signal noise, audio hums, or video disruptions—especially problematic during live performances. Physically, power cables carry higher currents that can induce magnetic fields affecting sensitive data lines.
Storing mains power cables in one section and low-voltage signal or data cables in another isn’t just about organization; it’s about safeguarding signal integrity. Using dividers or separate compartments helps prevent accidental cross-contact. When crossing power and data cables, doing so at right angles rather than parallel minimizes electromagnetic coupling, reducing interference.
Additionally, keeping fiber-optic and delicate data cables away from heavy power cords protects against crushing or strain damage. Damage to these cables isn’t just costly—it can cause hours of troubleshooting or data loss, which impacts your professionalism and reliability. Proper separation and careful routing are investments that pay off by maintaining high-quality signal transmission and reducing downtime.
Beyond the practical benefits, this separation also helps you quickly identify issues during troubleshooting. If a signal problem arises, knowing that power and data are stored separately can significantly narrow down potential causes, saving valuable time during live events or client setups.
reusable cable ties for professional audio cables
As an affiliate, we earn on qualifying purchases.
As an affiliate, we earn on qualifying purchases.
Master the Art of Coiling Cables Properly
Improper coiling is a common cause of cable damage, tangles, and shortened lifespan. The over-under coiling technique is essential because it mimics the cable’s natural twist, reducing stress on the conductors and connectors. When cables are coiled incorrectly, they develop kinks and internal conductor fatigue, which can lead to intermittent connections or complete failure over time.
Respectting the manufacturer’s minimum bend radius—typically about five times the cable’s diameter—is crucial because bending a cable beyond this point can cause internal conductor damage, insulation wear, or compromised shielding. Such damage might not be immediately visible but can lead to signal degradation or failure over time. Using reusable hook-and-loop ties keeps coils secure without deforming the cable jacket, unlike tape or zip ties that can cause crushing or uneven stress points. Ensuring connectors are inside the coil prevents them from striking the case or getting crushed when packed tightly.
Heavy power cables or fiber-optic lines may require larger coils or specific handling to avoid stress. Checking the manufacturer’s instructions for specific bend radius and coiling recommendations is crucial because different cables have different tolerances. Proper coiling not only extends the lifespan of your cables but also makes setup and teardown faster and more reliable, saving you time and money in the long run. Additionally, consistently using proper coiling techniques can help detect early signs of wear or damage, allowing for preventive maintenance before failures occur.
cable labeling tags for stage equipment
As an affiliate, we earn on qualifying purchases.
As an affiliate, we earn on qualifying purchases.
Frequently Asked Questions
What is the best way to coil cables?
The over-under method is the best way to coil cables. It follows the cable’s natural twist, reduces tangling, and prolongs their lifespan. Always respect the manufacturer’s minimum bend radius, especially for fiber and coaxial cables.
Should power and signal cables be stored separately?
Yes, storing power and signal cables separately minimizes interference and physical damage risks. Use dividers or separate compartments to keep them organized and easy to access during setup.
Are hook-and-loop ties better than cable ties?
Reusable hook-and-loop ties are generally preferable. They won’t deform jackets or create stress points and can be used repeatedly, making them ideal for frequently handled cables.
How large should cable coils be?
Coils should be large enough to stay above the minimum bend radius—usually 5-10 times the cable diameter. Larger coils prevent stress and damage, especially for heavy power or fiber cables.
Should cables be stored vertically or flat?
Either works if coils are supported properly. Heavy coils are better stored low in the case, while vertical slots can improve visibility and access. Just ensure coils are stable and won’t shift during transport.
over-under coiling cable organizer
As an affiliate, we earn on qualifying purchases.
As an affiliate, we earn on qualifying purchases.
Conclusion
Getting your cables right in a custom flight case isn’t just about neatness—it’s about saving time, protecting your gear, and making every gig smoother. A little planning upfront pays off in reliability and speed behind the decks or on stage.
Think of your case as a well-tuned machine—organized, efficient, ready to perform. When you master these practices, you turn chaos into confidence. Now, go build that perfect cable setup and let your gear shine.
Fall Picks
fall essentials
As an affiliate, we earn on qualifying purchases.