TL;DR
Prime for Young Adults — start your free trial
Fast free delivery, streaming and member deals for eligible 18–24 year olds.
Try it freeAs an affiliate, we earn on qualifying purchases.
Stacking rack-mounted devices safely hinges on weight distribution, proper hardware, and secure mounting. Using rugged cases and monitoring transit conditions minimizes risks and keeps gear intact.
Transporting multiple rack-mounted devices sounds straightforward—until it’s not. A single poorly secured, top-heavy rack can tip over, causing damage or injury. If you’ve ever had a rack slide forward in a truck or bounce during a bump, you know how costly and frustrating it can be.
This guide walks you through the practical steps to stack your gear safely, from weight distribution to securing in vehicles. Whether you’re moving a single server or a full AV rack, these tips will help you protect your investment and keep everything running smoothly on the road.
Always place the heaviest equipment at the bottom of the rack to maintain stability during transit.
Use all four mounting points and manufacturer-recommended hardware to secure devices properly.
Choose shock-absorbing cases with elastomer mounts for sensitive gear to withstand bumps and shocks.
Secure racks firmly in vehicles with rated straps or tie-downs, not just wheel chocks or brakes.
Monitor transit conditions with impact and tilt sensors to document handling and prevent damage claims.
How to Safely Stack Rack-Mounted Devices for Transport
A single top-heavy, poorly secured rack can tip in one hard brake — damaging gear and injuring people. Safe stacking hinges on three things: weight distribution, proper hardware, and secure vehicle mounting. This guide walks the full protocol, from loading the bottom U to logging the journey.
Key Insight The heaviest equipment — UPS units, large servers, dense GPU rigs — always goes in the bottom of the rack. A low center of gravity is the single most effective defense against tip-overs during loading, ramps, and braking.
Six Rules That Keep Gear Intact
Whether you’re moving one server or a full touring AV rack, these six practices cover the journey from rack rail to loading dock.
Heavy Goes Low
Place UPS units, big servers, and GPU rigs in the lowest rack units. A 4U GPU server over 200 lb belongs at the floor, not at eye level — it keeps the center of gravity below half the rack height.
All Four Mounting Points
Never transport gear resting on front ears or unrated shelves. Use manufacturer-specified cage nuts, screws, and rails on every corner — plus OEM shipping brackets where offered.
Shock-Absorbing Cases
Standard cabinets are fine for data centers and terrible on bumpy roads. Use ATA flight cases or rotomolded racks with elastomer isolators and a known G-load rating.
Rated Straps, Not Brakes
Anchor the rack to the vehicle floor or walls with rated ratchet straps or tie-downs. Wheel chocks and brakes alone won’t stop a 2,000 lb rack from becoming a projectile.
Log the Journey
Attach impact, tilt, temperature, and humidity recorders. The data deters rough handling and provides objective evidence for insurance claims when things go wrong.
Lift Smart, Not Solo
Anything past ~50 lb gets a team lift or a mechanical server lift. Fully loaded racks demand pallet jacks, lift gates, and a plan for ramps, docks, and stairs.
Build the Tower on a Solid Foundation
Typical component weights in a mixed transit rack. Every heavy unit mounted high raises the center of gravity — and the odds of a tip-over on the first sharp turn.
Uneven loads warp frames. Poor distribution doesn’t just risk tipping — it stresses rails and mounting points on every bump, causing cumulative damage over frequent moves.
Static ≠ Dynamic Load
A rack rated 2,000 lb static may carry only a fraction of that on the road. Always load to the dynamic transport rating, and document final weight against the frame’s spec.
Center of Gravity Limit
Choose Your Armor
The cabinet that serves a data center will fail on a bumpy road. Match the enclosure to the journey — and to the value of what’s inside.
| Capability | Standard Cabinet | ATA Flight Case | Rotomolded Shock Rack |
|---|---|---|---|
| Shock absorption | ✗ Minimal — rigid frame | ✓ Good — foam + shell | ✓ Excellent — elastomer isolators |
| Vibration damping | ✗ Transmits road shock | ~ Moderate, foam-dependent | ✓ Rated G-load isolation |
| Drop protection (4 ft) | ✗ Not rated | ✓ Reinforced corners | ✓ Survives repeated drops |
| Reinforced mounting rails | ~ Static-rated only | ✓ Yes | ✓ Yes, isolated from shell |
| Best use case | In-building moves only | Touring AV, DJ rigs | High-value / sensitive loads |
The Six-Step Transport Chain
Run the full chain on every move — skipping one link is how racks end up as insurance claims.
Load Heavy Low
Heaviest gear in the bottom U; CG below half rack height.
Bolt All Four
Four mounting points per device, OEM hardware and brackets.
Case It
Shock-mounted case with elastomer isolators, known G-rating.
Strap Down
Rated tie-downs to floor or wall anchors — never brakes alone.
Log Conditions
Impact, tilt, temp, and humidity recorders attached and armed.
Lift Right
Team lifts or server lifts past 50 lb; plan ramps and docks.
The Cost of Skipping a Step
Real-world moves fail at the link nobody checked — and sensor data is what settles the argument afterward.
“In a recent move, an entire rack shifted because it wasn’t strapped properly. The damage cost more than the move itself.”
Field report · Touring AV transportThe Monitoring Stack That Paid Out
- GPS + shock logger recorded impacts exceeding equipment tolerance — insurance paid on the data.
- Tilt indicators document tip events during loading and unloading hand-offs.
- Temp & humidity sensors flag condensation risk — acclimate before powering on.
- Chain-of-custody logs protect data-bearing devices end to end.
Place Heavy Equipment at the Bottom for Stability
The first rule of safe stacking? Put the heaviest gear at the bottom of the rack. Think of it like building a tower—your foundation needs to be solid. Large UPS units, big servers, or dense GPU rigs easily tip the balance if placed higher up. For example, a 4U GPU server weighing over 200 lb should sit on the lowest rack units.
This keeps the center of gravity low and prevents tipping during acceleration, braking, or sharp turns. A common mistake is stacking lighter gear on top, which makes the entire load unstable. Always check the rack’s rated load capacity, especially when fully loaded.
Proper weight distribution isn’t just about preventing immediate tipping—it also reduces stress on the rack’s structure and mounting points. If the load is uneven, it can cause warping or damage over time, especially during frequent transport. Think of it as balancing a scale: uneven weight can cause the entire setup to become unstable with even minor jolts, risking damage to sensitive components or the rack itself.
rack mount server transportation case
As an affiliate, we earn on qualifying purchases.
As an affiliate, we earn on qualifying purchases.
Use the Right Hardware and Mounting Techniques
Proper mounting hardware is your armor against damage. Always use all four mounting points per device—never rely on just the front ears or shelf supports. Using manufacturer-specified cage nuts, screws, and mounting rails ensures that each device is firmly anchored, reducing the risk of shifting or falling during transit.
Consider that improper hardware or incomplete mounting can lead to catastrophic failures. For instance, a loose screw or missing cage nut might seem minor but could cause a device to vibrate loose or shift position, especially over bumpy roads. This not only risks damage to the device but can also cause injury if a component falls or shifts suddenly.
Installing internal restraints or shipping brackets, when available, adds an extra layer of security. These features are designed to absorb shocks and vibrations, preventing internal components from moving or suffering damage. Think of it as giving your gear a seatbelt—tight, secure, and designed to withstand sudden jolts. Proper hardware choices and meticulous installation are essential tradeoffs: investing time and effort upfront pays dividends by preventing costly repairs or replacements later.
As an affiliate, we earn on qualifying purchases.
Choose Rugged Cases That Absorb Shock and Vibration
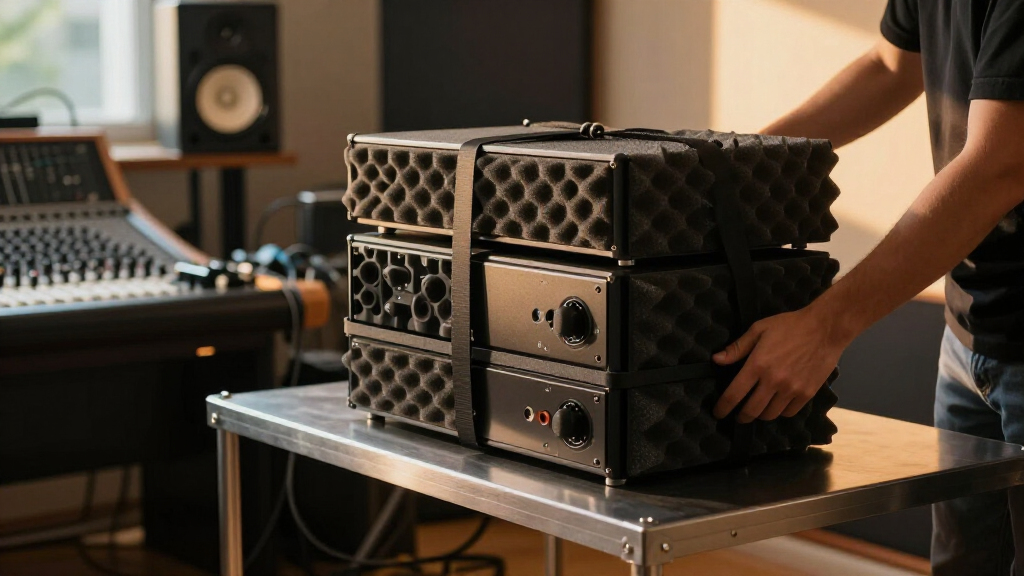
Transport cases matter. A standard rack cabinet is fine for data centers but terrible on a bumpy road. For mobile setups, use ATA-style flight cases or rotomolded racks with elastomer isolators. These cases absorb shocks and vibrations better than plain cabinets, significantly reducing the risk of internal damage.
Imagine a DJ transporting a large mixer and multiple rack units. A case with built-in elastomer mounts and reinforced corners can withstand drops and road bumps far better. These features act as shock absorbers, distributing impact forces away from delicate components. For sensitive gear, specify cases with known G-load ratings and shock absorption specs to ensure they can withstand typical transit shocks.
For example, a rugged ATA flight case with foam inserts and elastomer mounts can survive a 4 ft drop, protecting your gear from internal shocks that can cause immediate failure or latent damage. The upfront investment in such cases often saves money by avoiding repairs, replacements, or downtime caused by transportation mishaps.
As an affiliate, we earn on qualifying purchases.
Secure the Rack in the Vehicle Properly
Securing your rack to the vehicle is non-negotiable. Use ratchet straps or rated tie-downs attached to the rack’s built-in points or mounting brackets. Never rely solely on wheel chocks or vehicle brakes. Proper securement prevents the rack from shifting, tipping, or sliding during transit, which could cause damage or injury.
In a moving vehicle, the movement is unpredictable—sudden stops, turns, or acceleration can cause unsecured racks to become dangerous projectiles or sustain damage. For example, anchoring the rack to the vehicle’s floor or walls with heavy-duty straps distributes forces evenly and keeps everything stable. When palletizing, band the rack to a sturdy pallet, add corner protectors, and mark it with “Do Not Stack” labels. This helps handlers recognize the importance of careful handling and prevents accidental crushing or shifting during loading and unloading.
In a recent move, a DJ’s entire rack shifted because it wasn’t strapped properly. The damage cost more than the move itself, highlighting the importance of proper securement. Ensuring your gear stays put isn’t just about avoiding damage—it’s about safety and efficiency during every stage of transport.
As an affiliate, we earn on qualifying purchases.
Monitor Conditions During Transit for Peace of Mind
Impact and tilt recorders aren’t just high-tech toys—they’re practical tools. Attach shock sensors or impact loggers to your gear. They record any jolts, drops, or tilts during transit, providing concrete data that can be used to verify handling conditions. This is especially useful when dealing with high-value or sensitive equipment, as it helps you identify if your gear experienced excessive shocks that could cause damage.
For example, a high-value AV rack was shipped with a GPS logger that recorded a series of shocks exceeding the equipment’s tolerance. The data proved rough handling, and the insurance paid out. This kind of documentation can save you money and hassle by providing objective evidence of mishandling or accidents.
Temperature and humidity sensors are also useful, especially for long hauls or sensitive electronics. Sudden changes in environment can lead to condensation, static buildup, or other damage. Monitoring these conditions allows you to take preemptive steps—like letting equipment acclimate before powering on—to prevent costly failures.
Lift and Move Smartly to Avoid Strains and Damage
Manual lifting limits are around 50 lb for most people—beyond that, you need help. For fully loaded racks, use team lifts, pallet jacks, or motorized lifts. For example, a 2,000 lb fully populated rack needs at least two strong helpers or a lift with proper forks. Attempting to lift or move such weight alone risks serious injury and damage to the equipment.
Planning the move carefully is crucial. Ramps, loading docks, and stairs all require different handling techniques. Never lift heavy gear alone or overestimate your strength—using mechanical aids reduces injury risk and protects your investment. Properly securing the rack on a lift or pallet jack ensures stability during movement, preventing sudden shifts that could damage internal components or cause injury.
Remember: a fall or strain can cause irreparable damage to your back and your gear. Prioritize safety by using appropriate equipment and personnel, even if it takes longer or requires additional planning.
Plan for Environment and Long Hauls
Environmental factors matter. Allow equipment to acclimate to temperature and humidity before powering on, especially after a long haul. This prevents condensation and static build-up, which can damage sensitive electronics. For example, moving gear from a cold storage to a humid venue without proper acclimation can lead to internal moisture and potential short circuits.
Use anti-static bags and moisture-resistant packaging for shipping. For long-distance moves, consider climate-controlled freight or specialized handling. These precautions are crucial because rapid environmental changes can cause latent damage, leading to failures that are hard to diagnose later. Giving equipment time to reach room temperature and stabilize humidity levels minimizes these risks and ensures reliable operation upon setup.
Ultimately, understanding and mitigating environmental risks during transit helps preserve the longevity and performance of your equipment, saving you money and headaches down the line.
Compare Different Transport Options and Their Risks
| Transport Method | Shock Absorption | Handling Complexity | Best For |
|---|---|---|---|
| Standard Truck with Racked Case | Low, depends on case quality | Moderate — secure straps needed | General AV, DJ gear |
| Air Freight | High, but rough handling during transfers | High — multiple handling points | High-value, time-sensitive gear |
| Specialized Shock-Mounted Cases | Very high — built-in G-load ratings | Low — ready to roll | Sensitive electronics, heavy gear |
Choosing the right method involves understanding that each option has tradeoffs. Standard trucking is cost-effective but offers less protection against shocks, especially if the case quality is poor. Air freight provides faster delivery and higher shock absorption but involves more handling points, increasing the risk of mishandling and delays. Specialized shock-mounted cases are ideal for sensitive electronics—they absorb impacts effectively and simplify handling, but they come with higher costs and may require specialized equipment for loading.
Evaluating your equipment’s value, fragility, and transit timeline is key. Investing in the right transport method minimizes damage risks, maintains operational integrity, and ultimately saves money by reducing repair or replacement needs.
Frequently Asked Questions
Can I ship a fully loaded rack, or should I unload everything first?
It depends on your rack’s dynamic load rating and OEM guidance. Ruggedized transport racks are often rated for full loads, but standard cabinets usually aren’t. Always check manufacturer specifications and consider removing delicate or heavy components to reduce risk.Should I remove hard drives and data modules before shipping?
Many OEMs recommend removing drives for security and to prevent damage. Plus, removing drives simplifies chain-of-custody and data security. Always back up data and follow OEM guidance on component removal.How much weight can one rack safely hold for transport?
The key is the dynamic load rating, not the static weight. Most racks are rated for 1,000–2,500 lb in static conditions, but in transit, keep the weight below manufacturer-specified dynamic limits—often much lower—to avoid tipping or structural failure.Is it safe to lay a rack on its side for transport?
Generally, no—full racks are best kept upright. Some individual devices may be transported on their sides if cushioned and OEM guidance permits. Always check the manufacturer’s recommendations to prevent internal damage.What’s the best way to lift and move heavy, fully loaded racks?
Use team lifts, pallet jacks, or motorized lifts. Don’t rely on one person—most fully populated racks weigh 1,000–2,500 lb. Proper planning and equipment reduce injury risk and prevent gear damage.Conclusion
Secure stacking is about more than just stacking—it’s about controlling the whole journey of your gear. Proper weight placement, hardware, and securement turn a potential disaster into a smooth ride. Think of it as building a tiny fortress on wheels—your gear’s safety depends on it.
Next time you pack up, remember: low center of gravity, tight mounting, and solid securing turn chaos into confidence. Your equipment—and your reputation—will thank you for it.
Fall yard work Picks
leaf blowers
As an affiliate, we earn on qualifying purchases.